|
|
|
|
|
remote control selection | infrared remotes | "Simplex" remote control | "De Agostini" remote control | "Aurel" remote control | radio remotes | the PC as a remote control (Commander) | homebrew remotes | selecting key codes | key codes self-learning | radio receiver module pinouts
Nutchip can be controlled with a remote control, thank to an integrated decoder, suitable for both infrared and radio frequency codes.To build a system with remote-control capabilities you need to add just the receiver - and, of course , the remote control itself.
- Remote controls are easy to get as spare parts from electronics shops. They are basically of two kinds: radio-frequency (for example garage-door openers and alarms) and infrared (for example TV sets, HiFi, VCRs and DVDs). The latter are cheaper, best suited for beginners, and come also as "universal" or "all brand" models that are easy to find in TV shops.
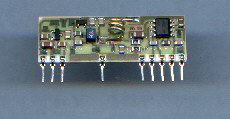
- Receivers are either specialized integrated or miniature modules requiring just a +5V power supply to work. Infrared recivers look vaguely like transistors and have three pins (+5V, GND, and output signal). Despite of their simplicity they feature excellent sensitivity. The radio-frequency recevier modules are available already assembled and tested, and look like a miniature circuit not much bigger than a post stamp. These modules have some extra pins, usually multiple power supplies, many GND pins for improved radio-frequency noise filtering, and notably the external antenna - which is the key to any radio transmission.
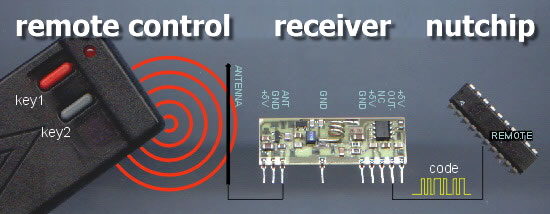
The remote control emits encoded radio signals: pressing a key, the respective code is repeatedly sent on the air. Radio signals travel on the air (or by means of an infrared light beam) until the are captured by the radio receiver (or infrared receiver), which converts them to logic pulses with a voltage of either zero or 5 volts . The pulses match exactly the original code sent by the remote control, but are not ready for immediate use. They need to be decoded by the Nutchip (by means of its internal decoder) in order to recognize the key pressed by the user.
The Nutchip internal decoder takes its input from the REMOTE pin. It is capable to recognize up to 6 different keys, with user-selected codes. These keys, named key1, to key6, can be included in the truth table in the same way we do for inputs. It is like having 6 keys connected to the Nutchip, as the decoding process is transparent to the user. Nutchips can decode either infrared or radio frequency codes, based on the kind of remote we select at the time of the programming of the truth table (see following for more about compatible remote controls).
To select the kind of remote control to use with Nutstation, go to the "Program chip" page and click on the remote selection button. The label next to the button (see figure) tells the remote control currently selected, a Visa Simplex universal infrared (IR) remote.
Clickin the arrow button allows to change the selection between one of the following remote types:
- Standard TV infrared remote control
- Visa Simplex infrered remote control
- Standard radio remote control
- Custom infrared remote control (you can change the codes assigned to each key)
- Curstom radio remote control (you can change the codes assigned to each key
These are the most common kind, as the are usually applied in TV and VCR remote controls. Not all infrared remotes are compatible and interchangeable, and the same remote control is not guaranteed to work with different models even on the same brand.
Nutchips are compatible to RC5 infrared remote controls, also known as "Philips type" encoding. Philips aside, other manufaturers which made compatible remotes include Akai - Blaupunkt - Grundig - Loewe - Metz - Minerva - Mitsubishi - Nec - Panasonic - Philips - Phonola -Radiola - Sanyo - Schneider France - Sharp - Siemens - Sony - Toshiba - Voxson.
This makes Philips-type remote controls very popular (and consequently cheap and easy to get), and almost all "Universal" preprogrammed remotes available off-the-shelf can be configured to work with Nutchips.
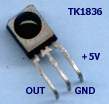
Infrared receivers look like a transistor. Of the front side there is a black lens for beam focussing: this is the sensor side that requires to face outside your device (usually thru a hole drilled on the prototype case). Infrered receivers differ for the carrire frequency they are designed for, and Nutchips require 36 kHz receivers. Slighlty different carrier can be used, at the expense of a lesser sensitivity (and therefore reduced operating range).
We suggest the model TK1836 or TSOP1836 (manufactured by Temic/Vishay), the following schematic shows how to connect it to the Nutchip.
How to connect an infrered receiver to the Nutchip. Using a remote control is as simple as connecting a three-pins sensor to the circuit. The remote control has its own specialized pin (REMOTE), therefore you can add remote control without sacrificing any input or output.
Getting an RC5-encoding infrared remote control is the first step for controlling the Nutchip, but after insuring the encoding scheme is the same we need also to inform the Nutchip which codes (= numbers) to use among the thousands an encoding scheme provides.
Each and every button in a remote control generates a different code, so we must make sure it matches the codes the Nutchips is expecting.To make life easier, Nutstation provides standard TV codes matching the buttons 1 to 6 on a TV remote control. Alternatively you can select the Visa Simplex remote control to set automaticallythe Nutchip for receiving the 6 keys provided by this standard remote.
Once you get familiar with the remote controls, you can always customize your remote control, choosing the codes to use for one or more of the six keys a Nutchip decodes. For example, you can set the Nutchip to react to VCR buttons that usually get unused on most TV remote controls.
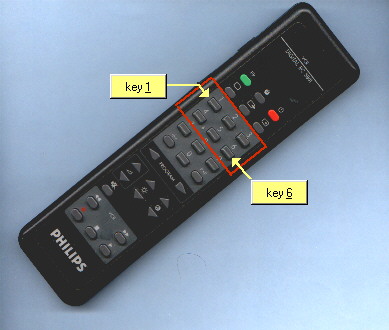
If your TV remote is Nutchip-compatible, select "TV infrared codes" from Nutstation to automatically program the buttons from 1 to 6 as the keys used for the truth table.
This TV remote control features extra keys for controlling a VCR: if you do not already use them, they are ideal for controlling a Nutchip as they don't interfere with normal TV activities.
To programe these special key-codes to a Nutchip, select a "Custom infrared" remote control type from Nutstation, and use the self-learning function to discover and set which codes to use.
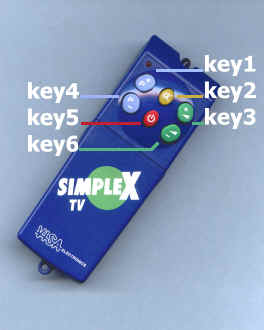
This remote control is available in most TV shops and malls as an universal spare part. Handy, compact and with a nice design, it sports 6 coloured keys and it is ideal for use with a Nutchip.
When using the Visa Simplex™ with a Nutchip NUT01-AK, all you have to do is to rember to select it as the default remote control prior to Nutchip programming. Being universal, you can also use it with the specialized NUT01-DEA, except you must use the self-learning function.
The photo shows the correspondance between the remote keys and the key numbers to be inserted in the truth table.
Note: on first use, you must set the Visa Simplex™ to use the right infrared encoding, following the procedure on the user manual:
- For the standard Nutchip AK: first Philips code in the user manual (2-2-2-5)
- For the special Nutchip DEA: first Sony code in the user manual (2-2-4-5)
This remote control is supplied with the DE agostini Robot, and is compatible with some Sony™ TV sets.
To use this remote control you must ask for a special part, the NUT01-DEA Nutchip.To program the key codes to use, choose "Custom Infrared" as the remote control type from Nutstation, and input the key codes matching the six keys you want to use in order to control the Nutchip. Alternatively you can use the self-learning procedure.
A special section on this site gives more details about the specialized Nutchip devoted to the De Agostioni Robot users.
When a remote control needs to operate over walls other obstacles which break infrared light beams, radio remotes enter the scene, Radio remotes are the common choice for alarms and door openers, and are available from electronics shops. Differently from TV remotes, current radio remote models are smaller and are usually limited to one, two or four keys maximum.
The radio receiver is a small circuit supplied ready-made. Despite of the number of pins, it really requires only a few connections to the +5V power, GND and a small antenna to get up and running.The range of a radio remote control depends on a number of factors: transmitter power, antenna gain, and reciver sensitivity. The transmitter (remote control) and receiver must operate on the same carrier frequency and use the same modulation type (e.g. AM, FM). The frequency of the modules used in most of our projects is 433.92 MHz, which is reserved for licence-exempt uses like remote controls in most European Countries. Is up to you to check if the same frequencies can be used in your Country according to local regulations, and to use a different module and remote control transmitter if required.
The 433.92 MHz transmitter and receiver modules we adopted are listed in the parts pages. Most are pinout-compatible, that is they can fit the same printed circuit board, therefore the part specified in the schematic as per receiver can be replaced by equivalent modules.
How ti connect the radio receiver to the Nutchip, in order to build a radio remote control. This schematic applies to Aurel and Mipot receivers as well. At first sight, this schematic can look more complex than the infrared version; but at a closer inspection, you will see that the many pins from the module get connected to +5V, GND, REMOTE as in the infrared schematic. We also added a pair of capacitors (C2 and C3) to ensure proper power filtering. The only remining pin is the antenna, which can be connected to a short wire about 20 cm. long.
As in the case of infrared remote controls, the encoding scheme used by the remote control for transmitting the key codes must be compatible with the Nutchip internal decoder. You must ensure that the remote control transmitter is using one of the following integrated circuits: MM53200, UM3750 or UM86409.
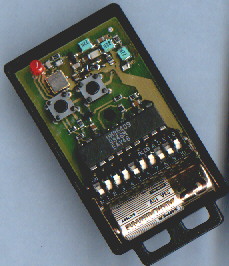
A radio remote usually includes a dipswitch, that is a series of up to ten small switches. Setting the dipwitch (you need a small screwdriver to flip these tiny switches) you change the codes sent by remote controls. This is an useful feature of radio remote controls - it would be embarassing if all door openers have the same code!
The usual configuration allows to set a base code with the dipswitches, after that any key adds a fixed number (from zero to eight) to the base code.
Example: if the base code is set to 1320, the first key transmits 1320, second key 1321, third key 1322, the fourth key 1323.
The simplest way to set the curstom key codes when using a radio remote control is by means of self-learning feature offered by Nutstation.
The dipswitch (here is seen between the battery and the integrated circuit) sets the key codes.
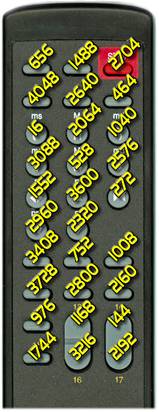
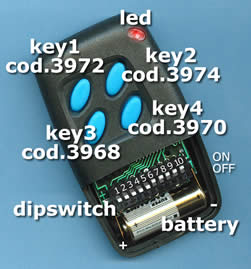
The dipswitches of an Aurel 4-keys remote control are placed in the battery compartment. To expose them remove the battery lid, sliding it gracefully.
There are 10 dipswitches, set them as shown in the photo (see left). The codes shown are valid when setting the first 5 switches from left on the OFF position (switch slider down) and the other 5 switches on the ON position (switch slider up).
This configuration generates the following codes:
- key1=code 3972,
- key2=code 3974,
- key3=code 3968
- key5=code 3970
The codes change if you set the dipswitches to a position other than the one show. This requires to reprogram the Nutchip with the new set of codes should you flip the dipswitches.
In order to set the codes to be programmed by Nutstation, click on the remote control button to set the "Custim radio (RF)" remote control type, the follow the instructions about setting key codes.
Here are the codes you get from an Aurel 4-keys remote control if you set the dipswitches like this photo.To set the dispswitch remove the battery compartment lid.
For sake of completeness we describe also the Nutchip's virtual remote, a software which emulates a remote control on the PC screen. This is not a true remote control (it does not make use of the REMOTE pin), but acts very much as the real thing. In order to use Nutchip Commander sfotware, your board must be connected to the PC through the serial interface as used for Nutchip programming .
There are no differences other than this: the Commander can be used as a real remote control, and the Nutchip won't tell the difference.Another "real" infrared/radio remote control connected to the "REMOTE" can be used as well when using Commander, so you can have two remotes working at the same time.
Commander offers additional features to the Nutchip experimenter, like a status display and input/output LED monitor: see the Nutchip Commander pages for details.
You can also build a remote control by yourself, following our design. Ready-made remotes are cheaper, smaller and look great, so the main reason for building one by yourself is the need to fit special needs, or add extra circuitry. For example, you could need to interface them to a water leaks sensor, to know when the door downstairs opens, or to hack your mailbox in order to set a signal when new mail is in
The truth table identifies remote control keys as key1 to key6. But how a Nutchip gets to know which key is actually first in your remote control, and which code does it really transmit? Similar remotes built by different manufacturers have the same keys in different positions... Not to mention the fact that is not unusual for a remote control to have dozens of keys...What codes do they send?
To select a remote control click on the arrow-button next to the remote control description in the Nutstation Program Chip page. If you use a standard remote control (as the Visa Simplex or a TV remote) all you need to do is to select it from the remote control list which appears on-screen. Nutstation knows how these remotes are made and sets the codes automatically. That's it.
But if you want to use different codes other than the standards you need to create a Custom remote. Click on either Custom Infrared or Custom Radio. The remote control picture that appears tells the codes currently set on your computer. To change them, just click on a key.
Example: setting a 4-keys radio remote control dipswitch to get the base code 1530, we need to set the following key codes:: key1 = 1530, key2 = 1531, key3 = 1532, key4 = 1533 (The remaining codes key 5 e key6, are unused and can have any value).
Start Nutstation and load the truth table. Before programming the Nutchip, clickClicking
, the "Modify key code" window pops up:
Enter the code for key1 (1530 for our example) and confirm with OK. Ensure the remote control picture labels are update with the new code. Continue repeating the steps until all key codes are set.
The code setting are automatically retained by Nutstation, so that you don't need to enter them again in future projects (at least, until you change remote control).
Nutstation can also learn the key codes form a working Nutchip board (of course, equipped with the infrared or radio receiver) connected to the PC. Just power up the board and open the Modify key code window (see previous paragraph for procedure)
press a remote control key
As you click the "Learn" button Nutstation enters the key code for you (if your board is not working the button is automatically disabled). Pressing different remote control keys you must see different key codes, if not your remote control is not compatible or the receiver does not work properly.
Alwais check your receiver's pinout against schematics and PCB, as different manufacturers assign different meanings to the pins:
- Infrared receivers: pinouts on our schematics refer to TK1836 - TSOP1836 manufactured by Vishay/Telefunken.
- Radio receivers: pinputs on our schematics refer to model 2-5000650 (manufactured by Mipot), NB-CE, RX-4M50RR30SF, RX-4M50SA60SF manufactured by Aurel. These receivers are interchangeable: in order to be compatible with all of them, our schematics adopt a compatible pinout. Please note that not all receivers have all the pins phisically fitted on the module. Refer to pin numbers, wich in some models start from #2, before placing the module in your circuit.
More details about pinouts and modules pictures on the components page.