Event_Logger v9 – Guided Tour
[May 5, 2010. Including new features of v 9.1]
Going through this guided description of functionalities, you will understand the benefits of this new software version and why Event_Logger could be an essential tool for your TomTom device.
Event_Logger v9 offers a vast improvement over the previous releases and provides end-to-end management of itineraries from planning to reporting, fully integrated with Google Maps and TomTom. Event_Logger v9.1 introduces additional screen and log functionalities, consolidating all enhancements of Event_Logger v9.0.
The following document introduces the features of some major components, starting from GMapToITN, which is a Web Application included in Event_Logger that allows designing an itinerary through Google Maps. It also shows some of the new features of GPX Browser (gpx.xsl), another Web application which was already available in previous Event_Logger versions to allow interactive track analysis.
Moreover, Event_Logger v9 introduces a new reporting tool called ITN Browser, here described. Through this tool, browsing a set of Itinerary files will be extremely easy and will allow to quickly review past travels.
The core stack of Event_Logger v9 provides many enhancements and this document presents them through screenshots.
Again, thanks to people who already donated, supporting my work.
GMapToITN
GMapToITN converts routes and points of interest from Google Maps to TomTom ITN files, with no restrictions.
Google waypoints are fully managed and draggable directions and points of interest (POI) are allowed.
After designing the whole itinerary with the standard Google Maps web application, including multiple subsequent destinations and points dragged on the path to customize the route, the TomTom Itinerary data is generated by selecting a simple bookmark: a panel appears, presenting the ITN report ready to be copied to a file on the TomTom device. Data can be further customized through an easy user interface, providing appropriate configuration switches. POIs produced by Google local searches are presented as multiple destinations and every point or destination includes the related description.
GMapToITN is compatible with virtually any Internet browser and does not require installation (just a bookmark is needed).
When getting directions with Google Maps, each destination (e.g., each green alphabetical mark represented by Google Maps) is translated into a TomTom stopover (arrival point in ITN files). Customizing your route with Google Maps by dragging direction lines to different locations will be managed without adding new TomTom ITN arrival points (unless the "Destinations" option is used).
Google Maps can also be used to find single addresses and points of interest (POIs) through the related Google local search options. Each represented point of interest provided with a mark is converted into an ITN file element. Multiple results in Google local searches generate a list of individual ITN waypoints preserving the order used by Google Maps.
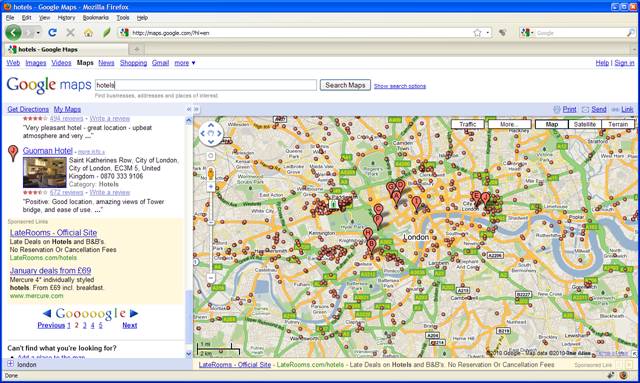
In order to plan an Itinerary, open Google Maps with your preferred browser and get directions (Google Maps instructions can be of help):
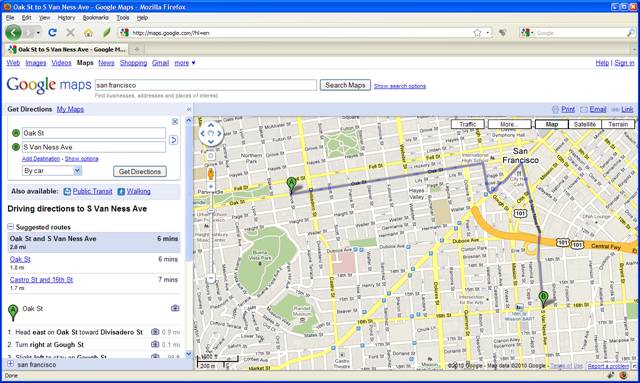
Customize your directions with Google Maps as usual, by clicking and dragging any point on the purple directions line to any location of the map, so that Google Maps immediately re-creates the directions on both the map and left panel.
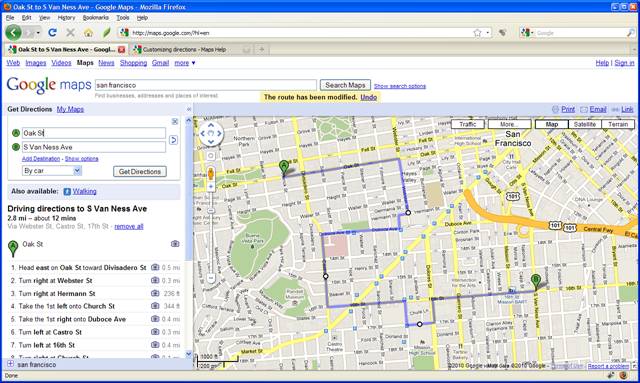
Notice that the added points appear as white dots on the route. These white marks are used by GMapToITN to log the customized route without adding new destinations. For instance, the above example shows a starting point A, an ending point B and three intermediate route points of a single route.
If more stops are needed, you can add multiple destinations to your directions. As usual, follow Google Maps instructions to perform this.
The following picture shows an example of multi-destination path with customized directions:
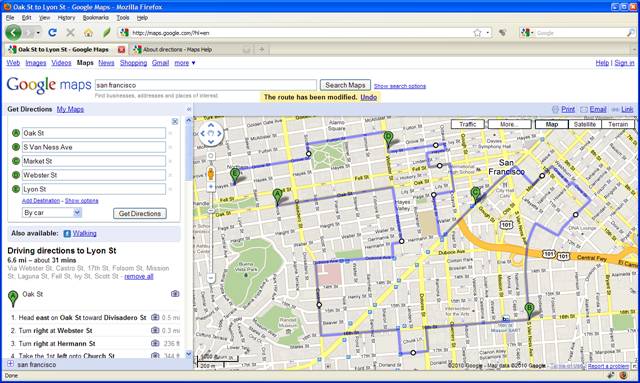
Each green mark labeled A to E in the picture is considered as arrival point by GMapToITN (intermediate or final), while white dots are logged as waypoints within each specific destination.
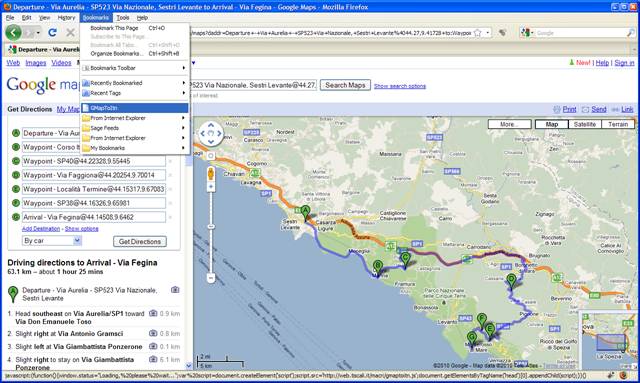
To create the Itinerary data, simply select the GMapToITN bookmark you have installed, like in the following picture.
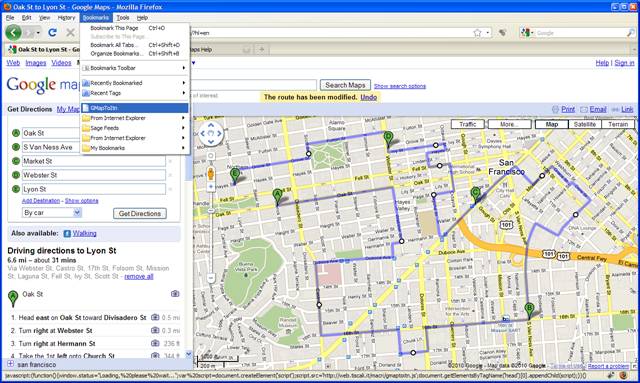
After selecting the bookmark, the following screen appears.
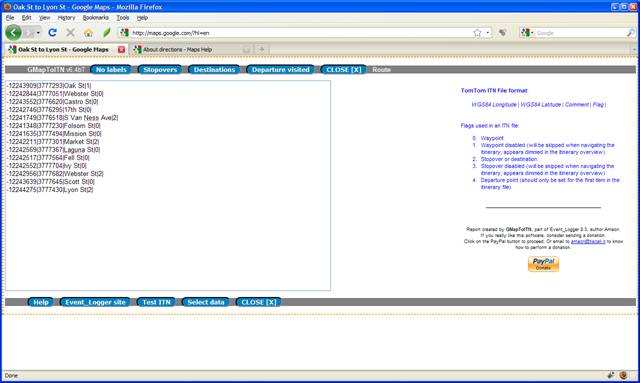
If necessary, the produced report can be manually modified before moving it to TomTom.
Besides, GMapToITN provides the following switches to customize directions:
- "Labels" / "No labels": it allows toggling the inclusion of P-xxx labels for route points and S-xxx labels for stopovers (or "Stopover -") in ITN files. Generally, "No labels" is the most suitable setting, while "Labels" might help when the default descriptions need to be complemented in such a way.
- "Stopovers" / "No stopovers": this switch toggles the mark-up of each stopover arrival. In case "Stopovers" is selected, when adding a new Google Map destination, this is treated as a new arrival point in ITN; otherwise (when "No stopovers" is selected), no intermediate arrival points are added in the Itinerary output and the drawn Itinerary is considered as a single route.
- Selecting "Full", "Route" or "Destinations" produces the following result:
- "Full" displays driving directions as a list of every single point on the line that Google Maps draws to represent the segment. Use with caution, as long routes may produce huge results, not convenient for a TomTom Itinerary.
- "Route" displays driving directions as a list of waypoints for each turn in the route. The waypoints will be in sequential order.
- "Destinations" only displays the starting point and all destinations of the route, including markers of modified paths (waypoints of dragged lines). This might be the most compact and effective option to generate ITN files.
- "Departure visited" / "All unvisited" / "All visited": this switch changes the status of the generated elements. Visited elements are shown grayed by TomTom. The default is that the starting point (departure) is visited (so that it is skipped by TomTom as destination), while all other points are marked as unvisited.
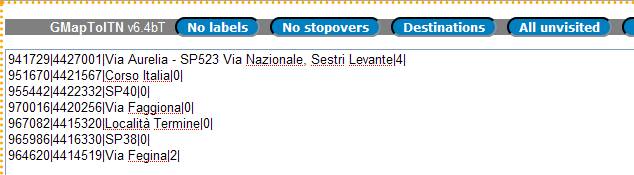
Another important functionality of GMapToITN is to allow creating Itinerary files including highlighted elements of a Google local search.
Here is an example of Google local search conversion.
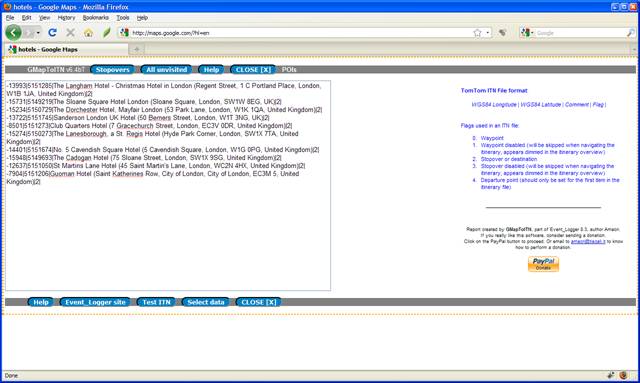
A subset of switches is shown for local search results.
To create the ITN file after GMapToITN has processed the Google Maps directions or local search, right click the text area detailing the list of waypoints, select all lines and copy them (alternatively, press the button named “Select data”, which helps you in this operation).
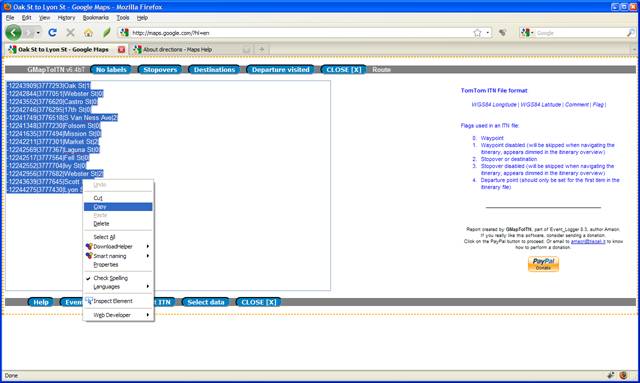
Then open notepad and paste the selection to it. Save the ITN file providing an appropriate name and move it to the Itn directory of TomTom.
Another functionality of GMapToITN is the “Test ITN” button, which allows to immediately verify the produced Itinerary data; for instance, the following screen appears.
See ItnBrowser.htm for a description about this output.
When using Internet Explorer, GMapToITN shows an additional button named “Send To TomTom”, as represented in the following picture.
This button allows fast generation and upload of the Itinerary file to the TomTom device via TomTom Home, through a single click.
Currently, this procedure requires some setup steps and has the limitation that Itinerary flags set by GMapToITN are reset by TomTom Home; this means that a multi-destination path is always converted to a single destination itinerary (but can be manually edited through the standard Itinerary management procedure included in all TomTom devices).
Other than manually creating an itinerary file with notepad or exploiting the optional “Send to TomTom” button, a third method named SendTomTom allows transferring data to TomTom through the Bluetooth, without need of rebooting the TomTom device (a reboot happens when connecting or detaching the device to an USB link). This alternative method requires a specific installation and needs some prerequisite software, like Cygwin (on the PC) and btconsole (on the TomTom device).
To transfer Itinerary data to the TomTom device via SendTomTom method, press the “Select this Itinerary” button; with Internet Explorer, you can confirm the copy operation (otherwise right click the highlighted text area and select “Copy”). Switch on the TomTom device with Bluetooth and btconsole active (notice that the btconsole menu button shall be pressed only once after the TomTom boot, regardless of any subsequent suspend/resume operations, otherwise more instances of btconsole can be concurrently running). On your PC, select Start, TomTom, "From GMapToITN to TomTom" (this program has to be installed). A windows appears, requesting the name of the ITN file; after giving a file name, an unattended procedure should automatically transfer the created Itinerary file to TomTom.
At the end, on your TomTom you can open the Itinerary panel and load the transferred Itinerary file.
Event_Logger Agent
The core stack of Event_Logger v9 running inside TomTom devices supports any model and NavCore version, including NavCore v6, v7, v8 and v9, even if TomTom with its last version has introduced unexpected restrictions. Event_Logger v9 provides further enrichments to the features available with Event_Logger 8.2 (like the periodic ITN autoupdate during the trip), it is very responsive and does not inhibit TomTom’s functionality in any way. Timing for switch off and switch on splash panels have been carefully tuned. Bugs are virtually nonexistent.
Event_Logger v9 provides an upgraded highly performing screen management functionality including different fonts together with a new driver managing screen and keyboard interaction with NavCore, completely transparent to TomTom’s software. Besides, Event_Logger 9.1 dynamically selects fonts and window dimensions according to the screen size, to further enhance the panel readability while driving.
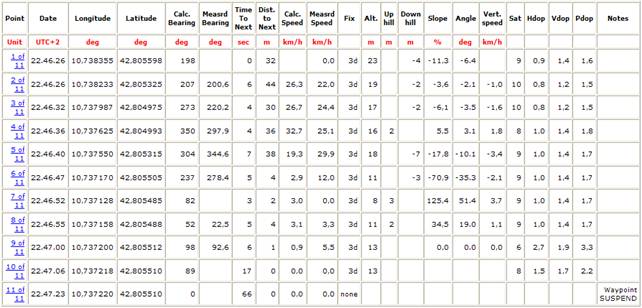
Event_Logger 9.1 introduces a new parameter in ITN files: the average speed excluding stops, which is shown in parentheses within the yellow area; one of the following forms is used, depending on the current satellite reception:
- <instantaneous
speed>-<max speed>(<average speed>)<speed unit>
[e.g., 80-110(70)km/h]
this the most generally used case and needs the availability of the instantaneous speed - max=<max
speed>(<average speed>)<speed unit>
[e.g., max=110(70)km/h]
this case is shown when the instantaneous speed is not received from the GPS device - (<average
speed>)<speed unit>
[e.g., (70)km/h]
this form indicates that both instantaneous and max speed are not available, while the average speed is presented (unusual condition).
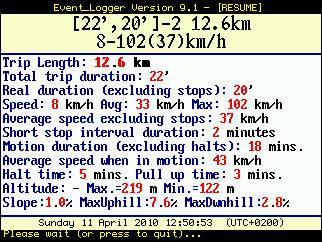
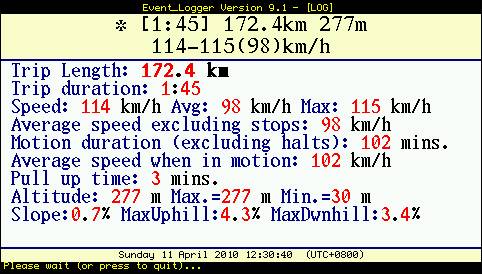
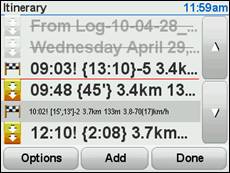
Version 9 of Event_Logger provides improvements to interactivity. Each time the device is switched off and on, by default a panel appears for few seconds in conjunction with the logging of the related event. This panel substitutes the flashing message appearing with previous Event_Logger versions and clearly reports comprehensive statistical analysis on the current or past trip. (Nevertheless, an appropriate Event_Logger switch named DoSdkShowMessage allows restoring the previous flashing message in case of TomTom NavCore SDK support, which only relates to versions 6, 7 and 8 but not to NavCore version 9.)
Here is the screenshot for a “suspend” operation, corresponding to switching off the device; the following panel appears for few seconds just before the device goes to the off state:
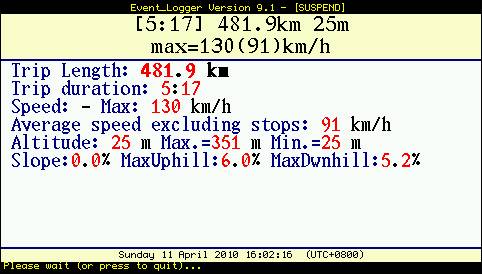
Panels change in relation to the device screen size and NavCore version, always optimizing fonts and geometry for readability. The following panel shows a “suspend” operation referring to a TomTom device with a smaller screen size than the previous sample.
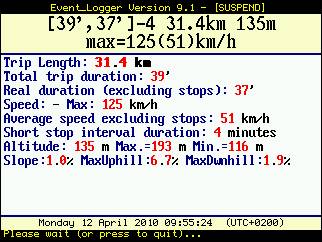
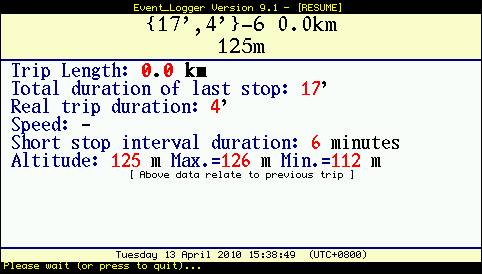
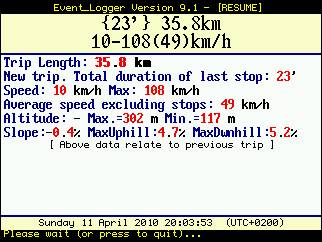
A panel representing the “resume” operation appears when the TomTom device is switched on again, reporting the stop time.
All Event_Logger screens can be closed by pressing the TomTom touchscreen and all automatically disappear after some time in order to help the driver maintaining control of the steering wheel.
This is a “resume” event after a short stop:
Again the panel conforms to the screen size:

This is a “resume” event after a long stop (wide and narrow screens):
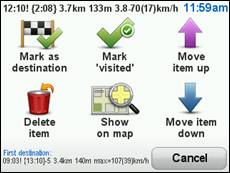
When the user selects the “Log Position to Itinerary” menu button or when pressing the screen very close to its top left margin (e.g., near the “+” zoom symbol during standard navigation), the position is logged and a description panel appears.
This is an example of “Log Position to Itinerary” operation:
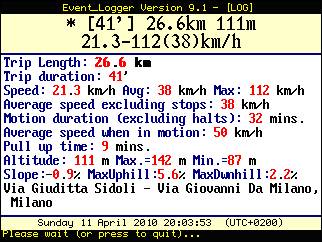
And the following refers to wider display size:
Other than displaying and logging statistical data upon events like power-on, power-off or menu buttons, Event_Logger automatically traces each trip into detailed, structured and organized GPX files, also archiving logs to appropriate ZIP files (which can also be password protected when needed).
Everything is smoothly performed through a completely unattended and reliable process, so that the user can be confident that all travels are correctly logged and archived.
Within GPX files, Event_Logger v9 automatically sets the user name, the e-mail and related language without configuration, basing on information stored by TomTom Home.
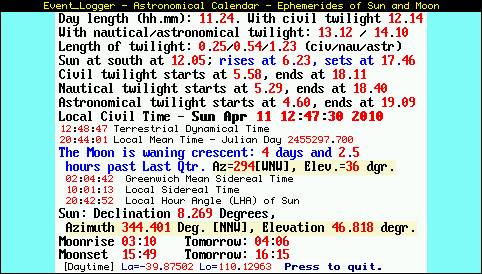
As in previous versions, Event_Logger v9 includes the “Astronomical Calendar”, which produces a report of georeferenced astronomical data related to sun and moon, including current calendar, ephemerides, rise and set time, civil, nautical and astronomical twilight, moon phase, etc. Example:
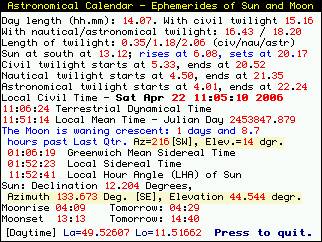
Also for the Astronomical Calendar, the panel automatically resized basing on the size of the touchscreen device.
In addition to the standard panels, Event_Logger provides the “Top” debugging tool, producing the same output of the UNIX top command: it continuously monitors the system until the touchscreen is pressed.
Example of Top (already available in previous Event_Logger versions):
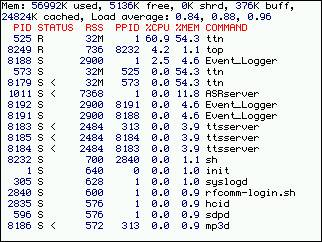
It is normal that Top reports three Event_Logger instances concurrently running: this is because Event_Logger consists of a Posix multi-threaded application which is shown in such a way by Linux /proc. Actually, only one single process and memory resource are used of the three shown Linux tasks.
If the screen is kept pressed for more than five seconds while Top is running, the “df” output appears (output of the UNIX “disk free” command). Example:

As Top is a tool for programmers, it may not be installed for normal operation.
Event_Logger provides a software development toolkit that a programmer can use to implement scripts and applications which are independent from the hardware and the specific NavCore version. Even if TomTom introduces changes to NavCore on all major versions, Event_Logger runtime let programmers design a program running unchanged with NavCore version 5, 6, 7, 8 and 9.
For every request sent by users over the time, a configuration option has been implemented. As a result, now Event_Logger allows almost 170 configuration elements which can be simply set through a PC, by editing Event_Logger.txt with notepad. You will find the existence of configuration switches for any need.
You might wonder why Event_Logger only allows rough input interaction with the touchscreen and why it does not provide advanced user interfaces to simply manage traces and configure options or output formats through TomTom. Actually, this is by design. User interaction with a navigation device is clumsy and above all dangerous. Very simple gestures let users avoid reducing concentration on driving, while any more elaborated procedures can be accomplished off-line, by connecting the device to a PC. All files generated by Event_Logger are standard formats that lots of PC applications can manage, much better than any process implemented on a device.
ItnBrowser
Event_Logger reports summaries of all travels in TomTom Itinerary files, automatically archived into appropriate ZIP files (password protected when needed).
Itinerary files are appropriately formatted text files (with proprietary TomTom formats), allowing planning journeys including routes with more locations, waypoints and destinations.
Itineraries can be copied, downloaded, installed on TomTom and managed within the device. To access them with your TomTom, from the Main Menu tap Itinerary planning. Tap Options. Tap Load Itinerary. Tap an itinerary to select it.

To support interactive analysis of sets of Itinerary files through a PC or Mac, Event_Logger v9 introduces an appropriate tool called ItnBrowser. It consists of a file named ItnBrowser.htm, which is a web application that allows to browse the content of TomTom Itinerary files, generating interactive reports. Supported browsers include Internet Explorer 6, Internet Explorer 8, Firefox 3.5, Chrome 4.0 and Safari 4.0.
ItnBrowser can browse any ITN file as well as the enriched ones produced by Event_Logger, aggregating data from more files and organizing the produced report in a very descriptive and readable table. ITN Browser is linked with GMapToITN (the Google Maps plugin allowing generating the TomTom itinerary data) and is also extensively integrated with Google Maps, exploiting all geodecoding and direction capabilities offered by Google.
For instance, ITN Browser allows to quickly identify which and how many destinations have been travelled for work in the previous month, together with the related distances, tour durations and stay times.
The easiest method to create an Itinerary file is exploiting Google Maps together with the previously described GMapToITN plugin, part of Event_Logger. Anyway, Event_Logger automatically creates enhanced Itinerary files including travelled origins and destinations and ItnBrowser can browse them by rendering all additional information included by Event_Logger. ItnBrowser is able to exploit the chaining method used by Event_Logger to link together a set of itinerary files including special tags, so that, through a simple click, all available routes are automatically listed in the appropriate sequence.
To start ItnBrowser, double click ItnBrowser.htm. As ItnBrowser can only read files in the current directory (apart from Internet Explorer with authorized ActiveX control), the file ItnBrowser.htm has to be copied in the same folder containing ITN files.
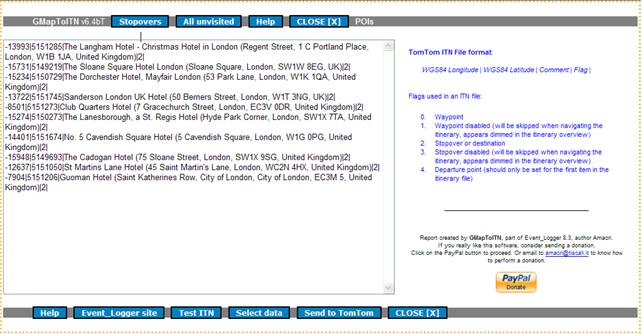
Usage is extremely simple. After starting ItnBrowser, the following panel appears:

Press “Select all”, so that the list of available routes generated by Event_Logger are presented. With Internet Explorer a popup may appear, asking to confirm an ActiveX control invoked by ItnBrowser. Confirming this popup is suggested for enhanced file management.
The method used by ItnBrowser to load chained Itinerary files is searching for a file named _Latest_Events.itn in the current folder (this file must be available, otherwise a popup error message appears after pressing the “Select all” button). After loading this file, ItnBrowser analyzes the included tag related to the name of the previous Itinerary file, recursively repeating this operation for all found itinerary files.
The following panel shows an example of file list resulting after pressing “Select all”.
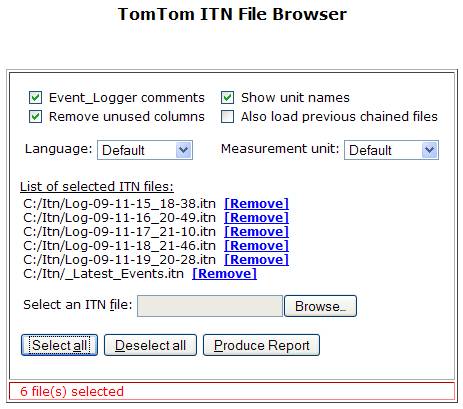
You can remove files by pressing the [Remove] tags or add additional files by pressing the “Browse…” key.
The initial mask of ItnBrowser provides configuration elements that allow customizing the report; after changing a configuration item, press again the “Produce Report” button to reflect the changed configuration into the table.
The usage of each configuration element is the following:
- “Event_Logger comments”: by default ItnBrowser performs a special processing of ITN lines with format “0|0|…” or “0|1|…”, used by Event_Logger to insert comments inside ITN files; uncheck if you are not dealing with ITN files generated by Event_Logger and you consider these lines as errors;
- “Show unit names”/ “Measurement unit”: by default ItnBrowser generates a report including default unit names within fields; the combination of these two switches allows to change the default unit and can remove the unit names within fields (e.g., removal of unit names might be useful in order to subsequently paste the generated table to a spreadsheet, for easy computation; if for instance you want to bring the generated report to Excel in order to sum numeric fields, select “km”, “miles” or “times” measurement unit and uncheck showing unit names, then generate the report, select all and paste results to Excel);
- “Remove unused columns”: ItnBrowser dynamically simplifies the generated table by removing unexploited columns; if you for some reason (e.g., an Excel template) need to statically keep all columns regardless from the real usage of fields, uncheck this flag;
- “Also load previous chained files”: this flag controls the process listing ITN files; check this flag before manually selecting an ITN file generated by Event_Logger if you need that, just after selection, ItnBrowser recursively loads the chained files reported inside each of them (notice that “Select all” embeds such process regardless from the setting of this flag);
- “Language”: change the default language used within the table fields and related Google Maps panels.
The buttons “Select all”, “Deselect all”, “Produce Report” and “Delete Report” are dynamically presented only when useful to you. To create a detailed interactive report including all information related to all selected files, press “Produce Report”.
Press “Deselect all” for fast removal of all selected files.
After pressing “Delete Report”, the table can be recreated by pressing again “Produce Report”.
Notice that tooltips are available for each input option or column header; hover the cursor over the related items, without clicking them, to allow tooltips to appear.
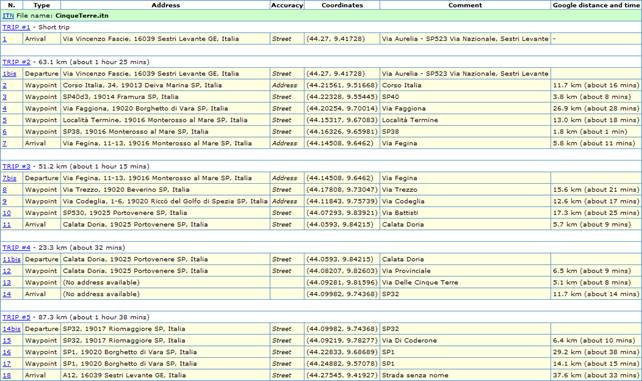
In order to better describe ITN reporting with an example, we consider now to create the report related to a standard Itinerary file generated though the TomTom menus managing itineraries, named for example CinqueTerre.itn (famous rugged portion of coast on the Italian Riviera) and including the following testing data:
941728|4427000|Via Aurelia - SP523 Via Nazionale, Sestri Levante|2|
951668|4421561|Corso Italia|0|
955445|4422328|SP40|0|
970014|4420254|Via Faggiona|0|
967083|4415317|Località Termine|0|
965981|4416326|SP38|0|
964620|4414508|Via Fegina|2|
973047|4417808|Via Trezzo|0|
975739|4411843|Via Codeglia|0|
983921|4407293|Via Battisti|0|
984215|4405930|Calata Doria|2|
982603|4408207|Via Provinciale|0|
981596|4409281|Via Delle Cinque Terre|0|
974368|4409982|SP32|2|
978277|4409219|Via Di Coderone|0|
968689|4422833|SP1|0|
957078|4424882|SP1|0|
941927|4427545|Strada senza nome|2|
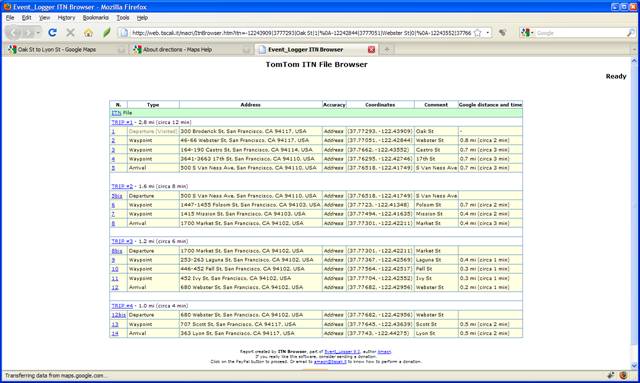
After some seconds of work, ItnBrowser produces the following advanced georeferenced report:
With Internet Explorer, creation date, last modification date and last access date for each itinerary file will be also shown (in case the prompt to use an ActiveX control is confirmed).
There are 5 separate trips in the previous picture, each of them consisting of waypoints delimited with departure and arrival positions. While some of the shown fields are generated by locally interpreting the source ITN data, others like address, accuracy, distances and times for each trip and for the related waypoints are calculated by querying Google maps. As the web geo queries take some time, the rendering operation can be monitored through a status field. A “Ready” flag indicates that the report is completed.
In the case of a standard Itinerary file (not generated by Event_Logger, like the example shown before), typically seven columns are displayed. Reports from Itinerary files generated by Event_Logger are much more detailed and include sixteen columns.
The meaning of the shown columns is the following:
- “N.”: Progressive trip number (each number corresponds to an ITN line); to better describe intermediate paths of a route, ITN items are repeated with the hypothesis that the restart of a route follows a stopover without changing position; the “bis” label marks each repeated item.
- “Type”: Flag included for each raw of the ITN file; the reported label reflects the following ITN flag numbers:
· Waypoint.
· Waypoint disabled (will be skipped when navigating the itinerary, appears dimmed in the itinerary overview).
· Stopover or destination.
· Stopover disabled (will be skipped when navigating the itinerary, appears dimmed in the itinerary overview).
· Departure point (should only be set for the first item in the itinerary file). Hovering the cursor over this field displays the original flag number of the ITN line.
- “Address”: address related to the coordinates; this information is fetched through a Google Maps query performed by ItnBrowser while rendering the table and is affected by the language selector
- “Accuracy”: level of precision of the address information shown in the previous column; this information is returned by Google maps together with the address
- “Coordinates”: Coordinates included in ITN file: (latitude, longitude) in degrees (WGS84 datum); hovering the cursor over this field displays the coordinates in degrees, minute, seconds format
- “Comment”: Name of this point in the itinerary (description field included in ITN file); hovering the cursor over this field displays the whole content of the original ITN line
- “Google distance and time”: distance and time between the current position and the previous one calculated through an on-line query to Google Maps; this information is affected by the language selector
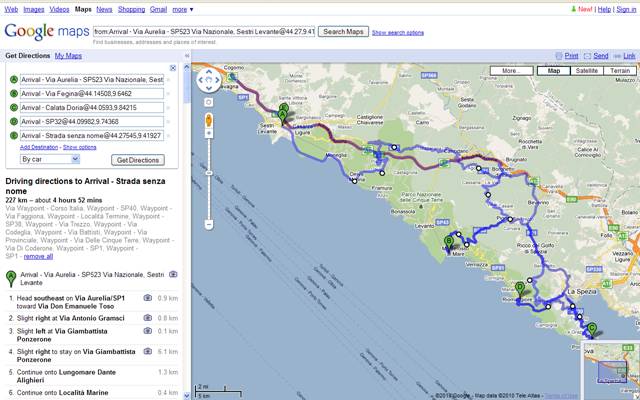
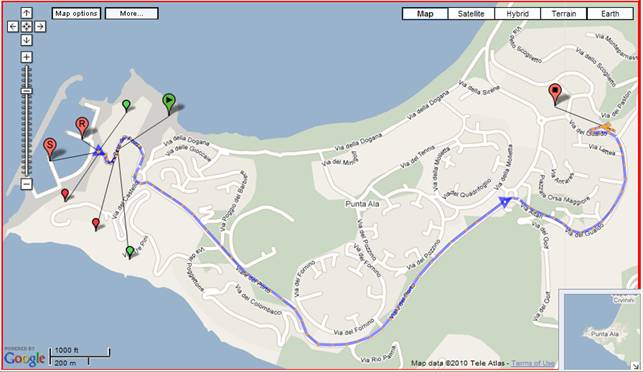
Notice that many elements of the produced table are clickable. For instance, when clicking on the ITN table on the top left corner (close to “File name”), the following Google Maps itinerary appears, describing the overall route including custom directions with initial, final and intermediate destinations.
If you click on “TRIP #2”, you get the following static description from Google Maps:
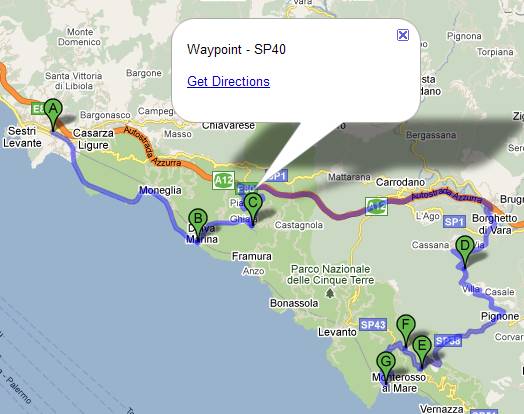
You can then switch to the dynamic mapping by clicking on one destination so that a popup window appears: clicking the “Get Directions” tag allows opening the editable panel; the following map will then be shown:
This allows you to edit the path (which is a sub-route of the whole Itinerary).
Notice also that any editable path (as the previous picture referring to a sub-route or the other one related to the overall route) can be translated again into ITN via GMapToITN, through a simple click.
After the generation of the new Itinerary data, some switches allow to better describe the obtained path: for an overall route, the default switches are the most appropriate ones. For a sub-route, remember to select the switch named “No stopovers”, so that the shown destinations are treated as waypoints of a single sub-route (also the “All unvisited” switch can be used in this case).
If you compare the ITN of this above picture with the related portion of Itinerary data of CinqueTerre, you might verify some slight changes of coordinate, which are produced by Google Maps when georeferencing data. At the end, itinerary data remain substantially unchanged if they are not manually edited.
By clicking the number of a single destination, like the following…
![]()
You get the Google maps graphically indicating the location.

Selecting Itinerary files generated by Event_Logger, ItnBrowser produces a much more detailed report like the following:
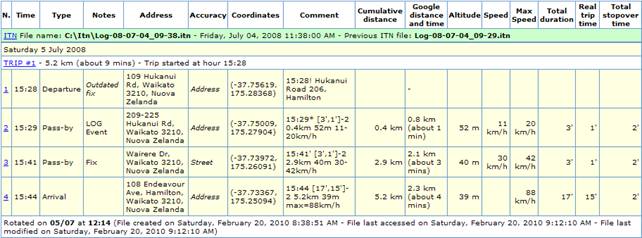
Some columns have already been described before; the additional columns are added by ItnBrowser when processing the description fields created by Event_Logger; their meaning is the following:
- “Time”: local time (hours and minutes) when the position was logged
- “Notes” – it can include the following lines:
§ “LOG Event”: fix related to the “Log Position to Itinerary” or “Log Position and Add POI” events driven by the user
§ “Fix”: position related to a periodic probe automatically performed by Event_Logger
§ “Outdated fix”: for a possible transitional satellite reception leakage, the GPS position was not available and the last valid position cached by Event_Logger was used to compensate the missing data; this might lead to inaccurate position compared to the actual coordinates
§ “Inaccurate time”: reported time was not locked to satellites and so considered inaccurate
§ “Invalid position”: in case no position is provided by the GPS and no recent position is cached by Event_Logger (maybe due to persistent satellite reception leakage), the position of the last trip was used to fill the ITN data
§ “Type shall be A instead of B” (with A and B numbers): this refers to itinerary files where flags are incorrectly used (NavCore can anyway load ITN files with incorrect flags and can fix them with a save operation)
§ “Restart”: this is a remark added by ItnBrowser when analyzing the itinerary file to indicate that the line is referred to a new start of the trip after a stopover
- “Cumulative distance”: travelled space between the starting point of the trip and the last measure (rather precise information calculated in real time by Event_Logger when logging the trip; this computation is supposed to be more accurate than a Google Maps query); the “Show unit names” configuration switch affects this field.
- “Altitude”: altitude above the sea fetched from the GPS device when active and related unit name; the “Show unit names” configuration switch affects this field.
- “Speed”: current speed logged by Event_Logger and related unit name; the “Show unit names” configuration switch affects this field.
- “Average Speed”: average speed excluding stopovers.
- “Max Speed”: maximum speed logged by Event_Logger within the trip; the “Show unit names” configuration switch affects this field.
- “Total duration”: Total trip duration including possible stopovers.
- “Real trip time”: Trip duration without possible stopovers.
- “Total stopover time”: Sum of all short stop periods within the trip.
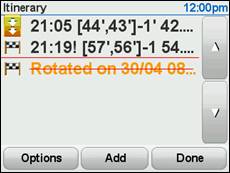
Comment lines might also appear for ITN files generated by Event_Logger, like the file name possibly reporting the link to the previous ITN file, the date when the file was created, a date change report related to a time sync automatically performed by Event_Logger (old and new dates), the “Rotated on” line reporting the date and time of the ITN file closure, etc.
GPX Browser
As mentioned, the Event_Logger agent running inside the TomTom device meticulously logs all travels into GPX files. As GPX is a standard, these files can be managed through a lot of available applications (for example, Google Earth). Anyway, Event_Logger also includes a GPX Browser (gpx.xsl) to allow interactive track analysis through Internet Explorer. This tool, which was already available in previous Event_Logger versions, has been enhanced with many new features here described with screenshots.
In summary, GPX Browser allows transforming the tracked itinerary into a browsable map.
To perform this, expand the ITN directory of your TomTom device with Windows Explorer, verify that gpx.xsl is available in this directory (in general, verify that gpx.xsl is available in the same directory of the GPX files), select a GPX file produced by Event_Logger (it might have either GPX or XML extension) and double click it or simply drag it to Internet Explorer; alternatively, open the GPX file with Internet Explorer (e.g., select the GPX file, press the right key of the mouse, select “open with”, select Internet Explorer). After some tens of seconds, a report is displayed like the following.

Overall statistics
|
Total length (including joins): |
4.734 m |
|
Real length (excluding joins): |
4.732 m |
|
Starting Time (UTC +2): |
Monday 25 January 2010 22.45.56 |
|
Finish Time (UTC +2): |
Monday 25 January 2010 22.57.11 |
|
Total duration (including stopovers and waypoints): |
00:11:15 |
|
Real duration without stopovers: |
00:09:18 |
|
Motion duration: |
00:07:37 |
|
Halt time (without stopovers): |
00:01:41 |
|
Halt time including stopovers: |
00:03:38 |
|
Average speed including stopovers: |
25,2 km/h |
|
Average speed without stopovers: |
30,5 km/h |
|
Average speed when in motion: |
37,3 km/h |
|
Maximum speed: |
76,0 km/h |
|
Maximum Altitude: |
56 m |
|
Altitude range: |
48 m |
|
Minimum Altitude: |
8 m |
|
North-South range degrees: |
0.010 deg |
|
East-West range degrees: |
0.033 deg |
|
North-South range: |
1145 m |
|
East-West range: |
2718 m |
|
Boundaries Lon/Lat: |
(10,737128, 42,796532) (10,770413, 42,806820) |
WayPoints Folder
|
Number of Waypoints: |
4 waypoints |
|
Maximum Altitude: |
0 m |
|
Altitude range: |
0 m |
|
Minimum Altitude: |
0 m |
|
North-South range degrees: |
0.000 deg |
|
East-West range degrees: |
0.032 deg |
|
North-South range: |
105 m |
|
East-West range: |
2664 m |
|
Boundaries Lon/Lat: |
(10,737220, 42,805510) (10,769840, 42,806450) |
|
Waypoint |
Date |
Alt. |
Name |
Description |
Symbol |
type |
Coordinates |
Address |
|
Monday 25 January 2010 22.45.56 |
|
Monday 25 January 2010 22:45:56 |
Via Cala Del Pozzo 12-23, Castiglione Della Pescaia {23'} |
Waypoint |
RESUME |
(42,805610, 10,738360) |
Via Cala del Pozzo, 6-36, 58043 Castiglione della Pescaia GR, Italy |
|
|
Monday 25 January 2010 22.47.23 |
|
Monday 25 January 2010 22:47:22 |
-2 {23'}! |
Waypoint |
SUSPEND |
(42,805510, 10,737220) |
Via Cala del Pozzo, 12/a, 58043 Castiglione della Pescaia GR, Italy |
|
|
Monday 25 January 2010 22.48.29 |
|
Monday 25 January 2010 22:48:28 |
-3 Via Cala Del Pozzo 12-5, Castiglione Della Pescaia {23',2'}! |
Waypoint |
RESUME |
(42,805510, 10,737220) |
Via Cala del Pozzo, 12/a, 58043 Castiglione della Pescaia GR, Italy |
|
|
Monday 25 January 2010 22.57.11 |
|
Monday 25 January 2010 22:57:11 |
[11',10']! |
Waypoint |
SUSPEND |
(42,806450, 10,769840) |
Via di Poggio alle Mandrie, 58043 Castiglione della Pescaia GR, Italy |
Folder with in total 4 tracks, 4 segments and 110(-4) fixes, each every 5,3 seconds in average
…
…

…
…
Notice that Event_Logger v9 uses the default TomTom user and email within the generated GPX files (they are saved to the TomTom device by TomTom Home).
Notice also that for each waypoint in the related table, also the geodecoded address is shown.
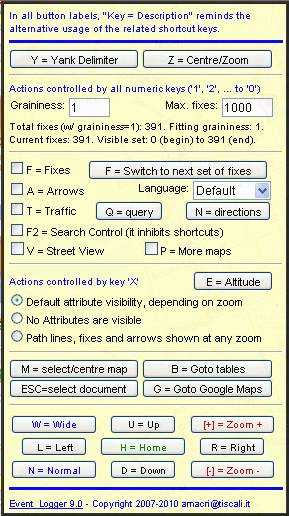
The resulted map draws a colored “polyline” representing the tracked route with descriptions, segmentation and waypoints. The map also allows interactive analysis. Press the “Map options” button to access the menu page.
Here is the new option panel:
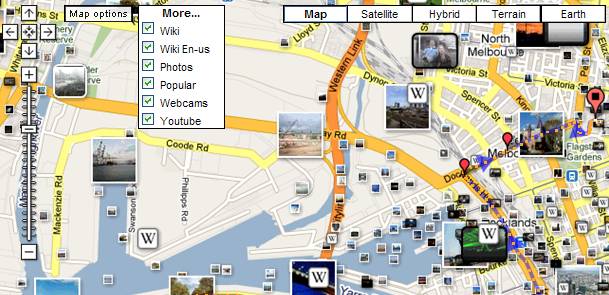
The map also shows a “More..” button.
Here is the result of the “More…” dropdown menu:
Within the map types, the “Earth” button is available.
Here is the integration with Google Earth:
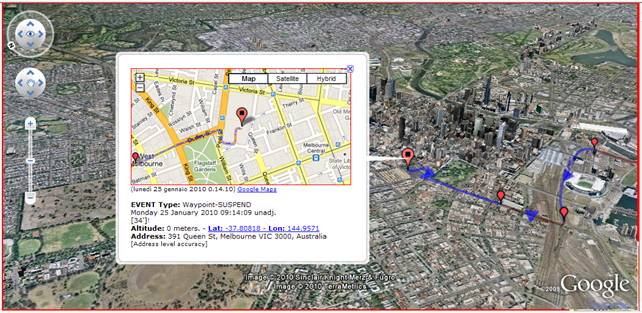
Notice that the browser embeds Google Earth together with all overlays related to the trip, like polyline, markers and marker popups.
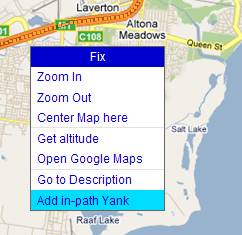
Besides, the map now allows context menus manageable with the right key of the mouse; here is an example related to a marker:
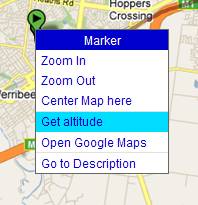
Another context menu, different from the previous one because related to a fix:
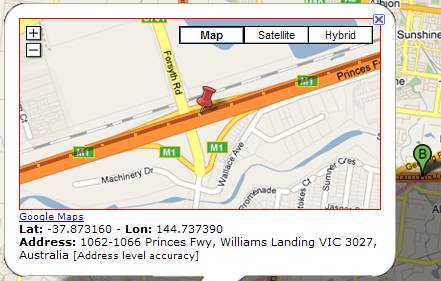
Pop-up windows have been enhanced and now include reverse geocoding. Here is a sample of description panel with geodecoded address:
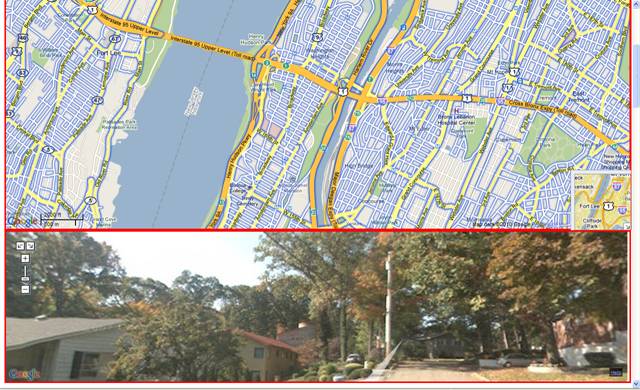
Event_Logger v9 introduces the integration with Street view; here is an example of a Street view overlay:
Another feature further enhanced direction by providing draggable markers:
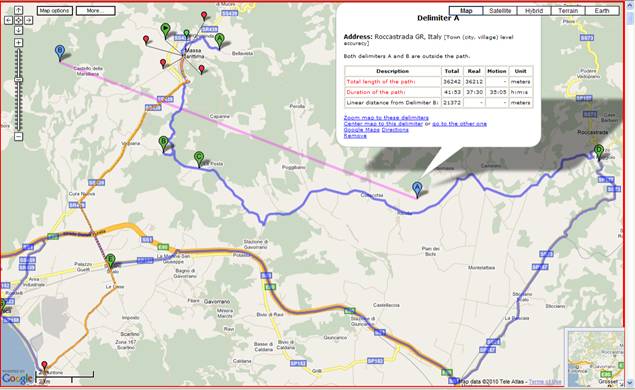
Green markers represent direction waypoints and can be dragged (as a matter of fact the related path is different from the travelled track represented with orange dots).
Blue A and B draggable markers represents the delimiters exploited by the interactive segment calculator of the GPX Browser.
Small red markers represent trip waypoints and can also be dragged to improve readability.
Documentation at http://web.tiscali.it/macri/Event_Logger describes many other functions available with Event_Logger, already presented in previous versions. Besides, the software comes with a detailed installation procedure.
Other enhancements introduced with Event_Logger v9 are not described in this document and will be left to the surprise of the user.
Given its powerful and advanced features, you may wonder how such a piece of software came to be. As with many other cases, the answer starts from a real need; then ideas have taken shape through passion.
Integrating Google Maps with TomTom makes route planning extremely easy also in case of complex directions with alternative paths and multiple stops. It's often useful to know how long a trip takes or the average speed of the current path. Reviewing routes in detail helps to improve ability in finding more efficient directions to face unexpected delays. Browsing a set of trips into one single page makes it simpler to work out how many business kilometers have been travelled within a period and to account for related destinations; it will help you manage a log book documenting travel allowance.
The process to transform a personal tool targeting individual requirements into a product encompassing a more general need allowed extending its rescue to all interested users. Version by version, its functionality has been progressively improved and Event_Logger v9 is now the synthesis of years of development, testing, feedback review and user support.
Installing the latest version of Event_Logger is easier then ever and you will find that learning the functionalities through the new panels will be natural and immediate.
Exploiting Event_Logger, you will experience a new awareness to query your navigator device and manage your travels.
If there were ever a time for you to consider using Event_Logger to power your TomTom, it would be now.