|
|
|
|
|
|
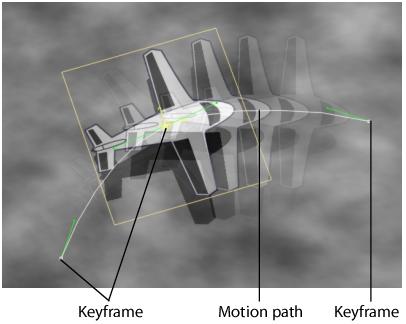
Animating with Motion Paths
Once you create two (or more) keyframes for a layer, you can adjust the way the layer moves by changing the shape of the motion path.
To create a motion path for a layer in a composite:
- In the Workspace panel, select the layer you want to animate.
- Use the playback controls to move to the first frame (or press Home).
- Enable the Animate button (A).
- Click the Toolbar tab, and then click the Arrow tool
.
- In the active viewport, drag the selected layer to its starting position.
- Use the playback controls to move to the frame where you want to create a second keyframe.
- Drag the layer to its new location (you can also rotate, scale, or adjust any other channel).
A keyframe is created, and the layer's motion path appears.
- Advance (or go back) to another frame, and move the layer again to create another keyframe.
The keyframes are joined by a motion path.
- Continue adding keyframes until you achieve a result you like.
- To change the shape of the motion path between keyframes, drag the tangent handles at a keyframe.
You can also adjust the speed along the motion path using the Speed channel.
|
|
|