Introduction
Welcome to combustionpaint animation and visual effects on your desktop. combustion contains all the tools and visual interactivity you need to produce compelling images.
This chapter explains:
About This User's Guide
combustion provides unified
painting, animation, and 2D/3D compositing, all within an intuitive workflow
environment. This guide attempts to explain all the features in this powerful software. It is designed to provide information both by topic and in the order of a typical
workflow.
If you are an experienced paint or effects artist, you can use the guide for
reference, turning directly to sections of specific interest.
If you are new to some aspects of digital paint animation and
compositing, you can browse the chapters from start to finish, read about the
tools, and follow the examples at your own pace.
Learning combustion
The documentation for combustion
includes:
- combustion Installation Guide
- combustion User's Guide
- Online Help
- combustion Tutorials
- combustion Hot Key Card
- README.TXT
(an online text file in the combustion program
folder).
Note: For information on FAQs (Frequently Asked
Questions), and training, consult the Support page on the Discreet web site at www.discreet.com.
Using This Guide with Macintosh and Windows
You can use this guide when working with combustion on a Windows® or
Macintosh® system. For commands that vary depending on your system's platform, both commands are
documented; however, most of the screen shots in this guide show combustion on a Windows
platform. If you are using a Macintosh, some elements may vary slightly.
Notation Conventions
The following style
conventions are used in this guide.
|
|
Convention:
|
Example:
|
|
Filenames or paths,
and values that you type in a field, are in italics.
|
Load a file from
the Particle
Libraries folder.
|
|
Menu selections are
indicated by dividing vertical lines
|
Choose Operators |
Stylize | Bump Map.
|
Key Features
combustion
offers a powerful suite of paint and compositing tools, integrated into
a single creative environment.
The following sections
describe some of the key features in combustion.
Workflow
- Flow-based architecture for
a non-linear workflow and unmatched productivity. See Quick
Tour.
- Schematic view to work with
the process tree directly.
- Footage Library view to
scrub through clips and view information for all the footage in the
workspace.
- Context menus for quick
access to modifying composites, layers, operators, channels,
keyframes, and more.
- Extensive caching for
real-time effects and clip playback. See Using
the Playback Controls.
- Ability to commit operators
to disk (pre-rendering) improves RAM cache performance for work in
progress.
Interface
Compositing
- Powerful 3D compositing and
even faster 2D compositing when the Z-axis, camera, and lights are
not needed.
- Nesting of composites. See Compositing.
- 3D Post effects based on
the 3ds
max® Rich Pixel Format (RPF). See Using
3D Post Filters in combustion.
- Motion blur. See Motion
Blur.
- OpenGL support for tested
cards so a composite can be modified, played, and rendered quickly.
Particles
- Powerful 2D particle system
with libraries of pre-defined emitters.
- Full control over all
emitter and particle properties, and the shapes used for the
particles.
- Sprite animation to control
movement, size, and many other properties of single-frame or
animated images.
- Particles operator is
integrated into the combustion
architecture to allow tracking of emitters, as well as compositing
and masking of the particles.
- Particles operator uses
OpenGL hardware when available.
Paint
- Vector-based paint and
animation: all paint strokes are resolution independent for
multi-format production.
- Text operator (and text in
Paint) creates editable text and generates character objects such as
timecode readouts.
- Real-Time Roto: paint in
one viewport while watching the result play back and loop in a
second viewport. See Changing
Animations On-the-Fly.
- Paint, Mask, and Selection
operators provide fine control over edge gradients.
- Includes a Store feature
for instant switching between brushes, clone settings, shape tools,
and more. See Storing Operator
Settings.
Selections
- Define vector-based shape
or channel-based regions for image processing and filtering
operations.
- Selections created using
the Discreet Keyer for advanced color extraction and color-based
rotoscoping. See Discreet Keyer.
- Selections convertible to
masks or Paint objects. See Changing
Object Types.
Animation
- Definable extrapolation
methods per channel. See Adjusting
Interpolation with Bezier Handles.
- Math operations on channels
or groups of keyframes. See Math
Operations.
- Speed channel to control an
object's movement on a motion path; the speed is independent of the
path itself.
- Pre-defined Ease In and
Ease Out curves.
Keying
- The advanced Keyer from the
Discreet SGI-based systems (inferno®,
flame®,
flint®,
fire®,
and smoke®).
See Discreet Keyer.
- Keyer and Mask operators
can save setups compatible with these systems.
- Difference Keyer generates
a matte from two sources with the same background but different
foreground elements. See Using
the Difference Keyer.
Color Correction
- The advanced Color
Corrector from the Discreet SGI-based systems. See Discreet
Color Corrector.
- The Color Corrector can
save setups compatible with these systems.
Tracker
- Follow and capture the
movement of an on-screen feature, and apply the data to other
objects, using the Tracker.
- Tracking data and setups
can be imported into other systems, including the Discreet SGI-based
systems.
Film Tools
- Use higher bit depth when
working with film for greater control over image quality.
- Lookup Tables (LUTs) can be
used with the Discreet SGI-based systems.
- Add and remove grain to
manage the graininess of clips and composite film elements more
effectively.
- Grain setups can be used
with the Discreet SGI-based systems.
Audio
- Audio scratch track. See Audio.
RenderQueue
- Unattended rendering of
multiple combustion
workspaces.
- Multiple outputs per
operator.
- Stand-alone Render Queue
for network rendering on Windows and Macintosh stations.
- backburner
client-server network rendering system on Windows stations.
Supported Files
Including:
- Cineon® file support
- Adobe® Photoshop® Layer
support
- Adobe Illustrator® file
support
- RPF file support
See Importing
Footage
What's New in Version 2.0
Here is a list of the new
features in combustion
2.0.
- Particles operator2D
particle system
- Schematic viewFlowchart-style
view of the process tree
- Footage Library view in
viewport
- Variable bit depth8, 10,
12 or 16 bits per channel, or floating point throughout combustion
(except the Particles operator, which is 8 bits per channel)
- LUTsBit Depth image
tools
- View LUTsCalibrate your
monitor
- Add Grain and Remove Grain
operators
- Redesigned text tools (in
Paint and a separate Text operator)
- backburner
network rendering system on Windows systems
- OpenGL supportUsed in
viewport for composites, and in the Particles operator
- OpenGL rendering mode
- 2D composites for faster
rendering
- Operators panel (and
floating Favorites palette) for quick access to operators,
especially for Schematic view
- Commit to Disk feature for
pre-rendering
- Switcher operator for
switching between two or more image flows quickly
- Speed channel for Paint,
Composite, Mask, Selection, and Particles operators
- Masks, Selection, and Paint
objects have edge gradients (masks are now like "GMasks"
in Discreet SGI-based systems)
- FTP after renderingAutomatically
post image files to an FTP site
- Support for QuickTime
Streaming format
- Interlace, Deinterlace,
Broadcast Safe Colors, and Reverse Dominance operators for video
work
- Quick Capturea QuickTime
capture utility
- Asynchronous File
Input/OutputFrees computer resources as file are imported and
rendered
- Macintosh OS X native
support
- New draw/transfer modes
added to Paint and Composite operators
For a list of changes,
see What's Changed in Version 2.0.
What's Changed in Version 2.0
Here is a list of some
changed features in combustion
2.0. Other smaller improvements are not listed here.
- You can save a thumbnail
with a workspace file, and then see it in the file browser when you
open the workspace.
- The Cropping feature in the
Footage operator is improved.
- A shortcut to the Display
Time As preference is added. To switch between Timecode, Frames from
0, and Frames from 1, click the Duration box in the playback
controls.
- Due to the changes for the
Schematic view, you can add an operator to the top of a branch (farthest
downstream node).
- In the Modes controls for
the Paint and Mask operators, there are new buttons for Swap
Foreground and Background Colors, and Default Colors. The respective
hot keys are still X
and D.
- There is a new option on
the status bar called Error Alert. You can click the warning icon to
view any error messages (such as when an applied transfer mode is
not possible in the OpenGL composite preview).
- Composite controls are
reorganized due to the new 2D composite mode. There is an extra
category of controls named Output and some items are rearranged.
- You can import and render
DPX files. You can import Maya IFF files, and import and render
QuickTime Streaming files.
- Since higher bit depths are
supported, the Cineon Color Convertor operator is not available
unless a version 1.0 workspace already includes it. Also, the Cineon
render options have changed.
- One new Footage preference
sets whether Cineon files are converted automatically to Linear
format when you import them, and another sets the bit depth to use.
- The Levels operator is not
available unless a version 1.0 workspace already includes it.
- Options are added to the
New dialog (such as Bit Depth), and you can add Text and Particles
branches to the workspace in one step.
- The options in the Object |
New menu are moved to the Object menu. The Composite/Paint/Solid
Layer menu option is renamed New Layer.
- The Toolbar options for the
four-corner layer shape are removed. Instead, you can select the
corners immediately after you enable Four-Corner (to do
corner-pinning, for example).
- The behavior of the Magnify
tool is changed such that you can drag in the viewport or scrub the
button to zoom in or out without deselecting the current tool. The
same behavior applies to the Grab tool for panning the viewport.
- In the Movie menu, there
are new options for Mark In Point, Mark Out Point, Go to In Point,
and Mark Out Point.
- Several hot keys have
changed. For example, you can press Ctrl+;
(Windows) or Command+;
(Macintosh) to show the Preferences dialog.
- The Anti-aliasing and
Supersampling options in the composite Settings controls are still
available for Best mode only, but the buttons are no longer disabled
for other display modes.
- The RPF options in the
composite Layer controls are only available after you select a layer
that uses RPF/RLA footage.
- The Home command is
available in the Window menu and via a hot key (=).
- Tooltips are available in
the Toolbar for the Composite, Paint, Mask, Selection, Text, and
Particles operators. A preference controls if they are displayed.
- The Reverse Load Order
preference is removed. Footage is always arranged in the Workspace
panel such that the last clip selected appears on top of the stack.
- The sliders for Cropping in
the Footage controls are more intuitive. Dragging inward makes the
crop value increase, which cuts more of the image off. Negative
cropping increases the frame size in the Footage operator.
- combustion
supports the wheel and middle button on a mouse if available. The
wheel changes the zoom factor and the middle button pans the
viewport. In a 'list gadget' such as the Workspace panel, the wheel
also scrolls the content.
- As you change a value using
a slider, you can right-click to cancel the change.
- In the Mask operator, the
Invert option for the Global Apply Mode is now disabled by default.
Also, as you draw an ellipse or rectangle mask object, the object
switches to display outlines only.
Quick Tour
This Quick Tour provides
you with basic combustion
functions and some of its workflow patterns.
This chapter introduces:
Getting Started
The very first step in
starting a new project is to bring footage into a workspace. The workspace
is the file that stores information that references your footage, composite
order and layout, animation, and operators. Like a document file in a word
processing system, a workspace can be saved, reopened, and edited at any
time.
The easiest way to bring
footage into a workspace is by using the Open command. You can choose from
many file formats for opening footage into combustion.
These include Video for Windows (AVI), QuickTime® (MOV), TARGA®,
and many others.
For more information about
getting started, see Starting a Workspace.
To open footage into a new composite:
- Choose File | Open,
or press Ctrl+O
(Windows) or Command+O
(Macintosh).
The Open file
browser appears.
- Navigate to the
folder containing the clip you want to open, select the clip, and then
click OK.
Note: You
can scrub the clips in Thumbnails view.
Ctrl-click (Windows) or Command-click
(Macintosh) to select multiple clips. Selected clips appear at the bottom
of the file browser. To remove a selected clip, double-click it in the
bottom part of the browser.
The Open Footage
dialog appears.

- Click Composite - 2D
and then click OK.
The footage is
imported into a new 2D composite. The size and duration are set to the
size and duration of the first file selected.
A new layer (or
layers) containing the selected footage appears in the composite. The
footage appears in the active viewport.

Managing Layers and Operators
When you import footage, it
becomes a layer in the selected composite. You can view the relationships
between footage, layers, and the composite by navigating in the Workspace
panel or in Schematic view.

To composite these two layers
together, you can add a Keyer to the Doggie layer. You can do this in
Schematic view or the Workspace panel.
For more information about
layers, see Compositing.
Expand the highest level
branch in the Workspace panel to see the composite.

Expand the composite to see
the layers contained in the composite.

Expand a layer to see that
layer's footage (and operators, if there are any).

Arranging Layers in the
Stack
Layers higher up in the
Workspace panel stack appear in front of layers lower down. You can
rearrange layer positions at any time by dragging them to their new
position.
When the Z-position of the
layers in a 3D composite is the same, the layer higher in the stack takes
precedence. In 2D composites, you do not have Z-position. You also do not
have lights or the camera.
Toggling Layer
Visibility
Hide a layer to temporarily
see the layers beneath it. You can hide a layer in a composite by clicking
the icon to the left of the layer.

Note: You can
also toggle the visibility for composites, operators, and footage by
clicking their icon.
Compositing
You can use imported footage
as layers in composites.
Compositing
is the process of combining layers together to form one final image. It can
be as simple as placing one partially transparent image over another one or
creating a split-screen effect. It can be as complicated as combining
blue-screen talent, multiple alpha-keyed CG layers, effects, backgrounds,
and text to create a science-fiction action sequence.
For more information, see Compositing.
Positioning, Scaling, Rotating, and Shearing
One of the simplest forms of
compositing involves scaling, rotating, and positioning layers so that
multiple layers are visible simultaneously and form one final result.
In the following example, we
orient copies of one layer to create a composite comprised of multiple
layers.

After scaling, rotating, and
positioning copies of the layer, the scene is transformed into something
more dynamic.

To orient layers in a composite:
- After importing
footage into a composite, expand the composite in the Workspace panel,
and select the layer.

The layer is
highlighted in the active viewport.
- Click the Toolbar
tab.
- Use the following
tools to transform the selected layers.
|
|
Use:
|
To:
|
|

|
Move the
selected layer in the active viewport. Use the tool options to
constrain the movement along the X-, Y-, or Z-axis.
|
|

|
Rotate the
selected layer in the active viewport. Use the tool options to
constrain the rotation around the X-, Y-, or Z-axis.
|
|

|
Scale the
selected layer in the active viewport. Use the tool options to
constrain the scaling along the X-, Y-, or Z-axis.
|
|

|
Shear the
selected layer in the active viewport. Use the tool options to
constrain shearing to the X-, Y-, or Z-axis.
|
|

|
Move the
selected layer's pivot point in the active viewport. Use the
tool options to constrain the movement along the X-, Y-, or
Z-axis.
|
Note:
You can also double-click the button to type in exact transform values.
- Click the
Transform button on the Composite Controls panel to fine-tune all
the transforms.

Keying and Masking
Use keying and masking
techniques to make areas of a layer transparent and see through the
layer to layers behind it.
Keying Out a Color
You typically use keying
in conjunction with clips shot in front of blue or green screens. The
keying process removes the specified color (typically shades of blue or
green) allowing you to see through to the layers underneath. For more
information on keying techniques, see Creating
Alpha Channels with Keyers and Discreet
Keyer.
In the following example,
the footage of a couple is shot in front of a green screen so it can be
composited over a background depicting a busy tavern.

To create the final
composite, first we combine the layers so that the front layer is in
front of the back layer.

After the layers are
combined, we use a keyer to key out the green from the front layer.

To pull a green-screen key:
- Import a front
layer (shot in front of a green screen) and a back layer into the
current composite.
- In the Workspace
panel, arrange the front layer so that it is in front of the back
layer, then select the front layer.

- Choose Operators
| Keying | Linear Keyer.
The Linear
Keyer Controls panel appears.

Note:
When using the Linear Keyer, it is easiest to attain good results when
Feedback is enabled. This lets you see the way the key changes
on-the-fly as you change keyer parameters.
- Click the color
picker
 , then click anywhere in the solid background color to sample the
background green.
, then click anywhere in the solid background color to sample the
background green.

- Drag the
Tolerance value until the background color disappears. A value
around 20-25% often produces good results.
Warning:
When the Tolerance value passes a certain level, you may begin keying
out portions of the image you want to keep.
- You can remove
more of the unwanted background color from the matte using the
Cleanup slider. Usually a Cleanup value of 100% works well.
- After you finish
adjusting the key controls, the key color is removed and the front
layer appears composited over the back layer.
Masking Layers
Masks perform a similar
function as keyers, except you use masks to define the shape of
transparent areas of layers. For more information, see Using
Masks.
In the following example,
a mask is used to isolate the subject in the foreground layer so it can
be composited over the background layer.

To create a rectangular mask:
- Import a front
layer and a back layer into the current composite.
- In the Workspace
panel, arrange the front layer so that it is in front of the back
layer, then select the front layer.

- Choose Operators
| Mask | Rectangular Mask.
The Rectangular
Mask operator opens and a default size rectangle mask is added to the
layer.

- Click the Toolbar
tab, and then click the Arrow tool
 .
.
- In the viewport,
use the bounding box to adjust the size and rotation of the mask.
For information on sizing and rotating with a bounding box, see Editing
Object Transform Properties.
- Click the Modes
button on the Mask Controls panel.
- The Modes
controls appear.

- Set the mask
Combine Mode to Replace.
- If necessary, you
can feather the mask edge. For more control over the feathering and
softness, use egde gradients.

- Click Invert to
invert a mask or adjust the opacity slider to vary the mask's
opacity.

- Return to the
composite to see the results of the masking operation: double-click
the composite in the Workspace panel or click the Back button.

Nesting Layers and Composites
Use nesting to combine
layers and composites in one workspace. For information on nesting, see Working
with Nested Composites.
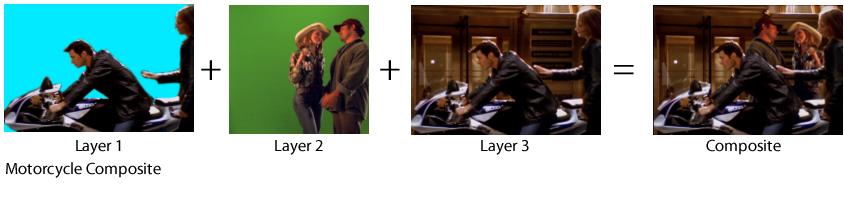
Creating Nested
Layers
Nesting layers means
taking selected layers (or a composite) and grouping them together. In
the Motorcycle Composite illustration, three layers are composited and
nested. Once the layers are nested, transforms can be applied to the
result.
Note:
Layer 1 in the composite is a copy of Layer 3 that has been masked to
isolate the subjects from the background.
In the following
illustration, the Workspace panel on the left shows the separate layers
that were used to build the composite. In the Workspace panel on the
right, you see that the three layers are inserted into a Nested Layer,
which, in turn, is rotated and scaled (thereby transforming all nested
layers simultaneously).
To nest layers:
- In the Workspace
panel, select the layers you want to nest.
- Choose Object |
Nesting.
The Nesting
Options dialog appears.
- Enter a name for
the nested layers in the Composite Name field.
- Click Selected
Layers, and then click OK.
The layers are
grouped together.
Applying Operators
An operator modifies a
layer or a composite. For instance, you can use a Keyer operator to key
out a portion of a layer, and then use a Color Corrector operator to
color match the layer to the background.

If, however, you drag the
Color Corrector operator below the Keyer, the key is created taking into
account the changes to the layer's color.

You can place an operator
anywhere in the branchon a layer, on the output of a nested
composite, or on the output of the entire branch.

At any point in your
project, you can move an operator to another place in the process tree,
modify its parameters, change its animation, copy it, or simply delete
it.
For more information, see
Applying Operators.
Applying an Operator to a Layer
You can add operators to
any layer in the workspace.
To apply an operator to a layer:
- Double-click a
composite to make it current.
- In the current
composite, select a layer.
- From the
Operators menu, choose an operator.
The operator
controls appear. The operator is applied to the selected layer over
its entire duration.
- Adjust the
operator controls.
Keyframing
You can animate a layer
by setting at least two keyframes for the layer's categories at
different times. A keyframe
is a point in time that records any change to a layer in your workspace.
Before you can create
keyframes, you have to enable the Animate button. For more information
on animating, see Keyframing.

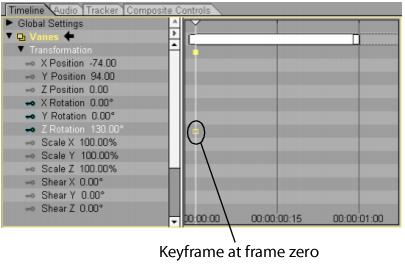
To animate a layer using keyframes:
- Enable the
Animate button (A).

- Select a layer (for
instance, we select the Vanes layer from the illustration above to
rotate the windmill's vanes).
- Press the Home
key to move to the first frame of the animation.
- Use the Transform
controls to set a rotation category at the first frame of the
animation. For instance, set the Z Rotation to 130°.
- Click the
Timeline tab, expand the layer that you want to animate, and then
expand the Transformation category.
You can see a
keyframe has been set for the Z Position channel.
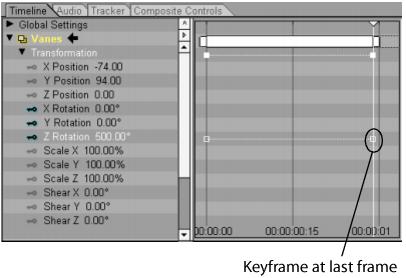
- Press the End
key to move to the last frame.
- Change the value
for the Z Rotation channel. To do so, click and drag your cursor
over the Z Rotation value in the Timeline list, or click the
Composite Controls tab and use the Transform controls.
A keyframe is
set at the last frame. The values between the keyframes are determined
automatically using interpolation.
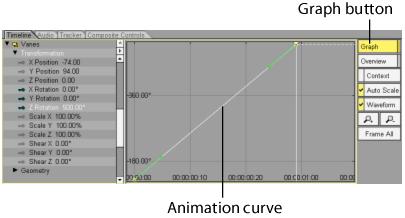
- Click the Graph
button to see the shape of the interpolated animation curve.
- Move back to the
first frame, and then press the Play button
 on the playback controls to watch the animation.
Note:
You can adjust the shape of the animation curve between keyframes to
create customized animations.
For information
on adjusting animation curves, see Editing
Keyframes and Animation Curves.
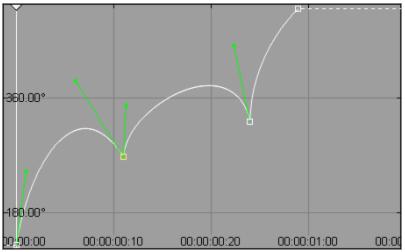
Animating with Motion Paths
Once you create two (or more) keyframes for a layer, you can adjust the way the layer moves by changing the shape of the motion
path.
To create a motion path for a layer in a composite:
- In the Workspace panel, select the layer you want to animate.
- Use the playback controls to move to the first frame (or press Home).
The motion path starts here.
- Enable the Animate button (A).

- Click the Toolbar tab, and then click the Arrow tool
 .
.
- In the active viewport, drag the selected layer to its starting position.
- Use the playback controls to move to the frame where you want to create a second
keyframe.

- Drag the layer to its new location
(you can also rotate, scale, or adjust any other channel).
A keyframe is created, and the layer's motion path
appears.
- Advance (or go back) to another
frame, and move the layer again to create another keyframe.
The keyframes are joined by a motion path.
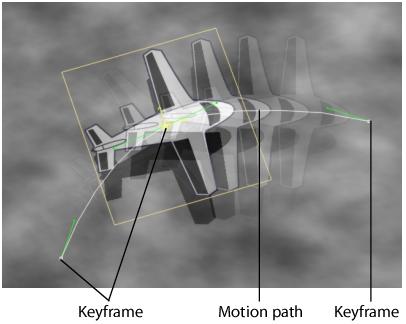
- Continue adding keyframes until you achieve a result you
like.
- To change the shape of the motion path between
keyframes, drag the tangent handles at a keyframe.

You can also adjust the speed along the motion path using the Speed
channel.
Copying and Pasting Keyframes
When creating animations
with multiple layers, you can save time by copying and pasting keyframes
between the layers.
To copy and paste keyframes from one layer to another:
- In the Workspace
panel (or active viewport), select the layer that contains the
keyframes you want to cut or copy.
- Click the
Timeline tab.
- In the Timeline,
expand the category with the keyframes you want to cut or copy, then
select the channel.
The keyframes
appear in the Timeline.
- Draw a rectangle
selection around all the keyframes you want to cut or copy.
- Choose Edit |
Copy or press Ctrl+C
(Windows) or Command+C
(Macintosh).
- Select the
channel to which you want to paste the keyframes.
- Position the
Timeline cursor where you want the first keyframe to be pasted.
- Choose Edit |
Paste or press Ctrl+V
(Windows) or Command+V
(Macintosh).
The keyframes
are pasted into the selected channel starting at the location of the
Timeline cursor.
sing the Paint Tools
Paint is an interactive,
vector-based and object-oriented drawing
operator that you apply to a layer as you would other operators.
It allows you to perform a wide range of painting tasks, from simple
retouching, to motion tracking, to full cartoon animation. As with other
painting-type software packages, there are tools for creating paint
strokes, geometric shapes, text, selections, and masks.
Unlike other packages,
every element you draw and create in the Paint operator is
non-destructive. As with all other operators in combustion,
at any point in the compositing process, you can go back into the Paint
operator and modify the objects.
For more information on
Paint, see Introduction to Paint.
In the following example,
we use the Paint tools to create a banner with an opacity gradient and a
text caption with a drop shadow over a composite.
Step 1: Creating a Paint Object
You use the painting
tools to create Paint objects such as rectangles and ellipses, text, and
brush strokes. In this example, we create a filled rectangle to use as a
banner in the composite.
To create a Paint object:
- Select the layer
that you want to "paint" and then choose Operators | Paint.
A Paint
operator is added to the layer.
- Press the Home
key to make sure you are positioned over the animation's
first frame.
- Click the Toolbar
tab.
- Click the lower
right corner of the Rectangle tool
 to create a filled rectangle. (Click the tool again to toggle
between filled and stroked mode.)
to create a filled rectangle. (Click the tool again to toggle
between filled and stroked mode.)
- Draw a rectangle
over the lower left portion of the image as illustrated below.

- Click the Arrow
tool
 and click the rectangle to select it.
- In the Paint
Controls panel, click the Modes button, then click the foreground
color box to specify the fill color for the rectangle.

The Pick Color
dialog appears.
- Select a bright
shade of red and click OK.
The rectangle
in the viewport turns red.
- Click the
Gradient color mode button.

- Click the
Gradient button to access the Gradient controls.

- Click the
Opacity gradient bar to add an opacity gradient tag, then drag the
new tag all the way to the left.
- Click the
Opacity gradient bar again, then drag the new tag all the way to the
right.
- With the right
opacity gradient tag selected, drag the opacity slider to 0%.

The red
rectangle turns progressively transparent.

Step 2: Adding a Caption
Now we need to add a text
caption to the banner.
To add a text caption:
- On the Toolbar,
click the Text tool
 .
.
Text tool
options appear.
- Set the text
properties to the following values:
- In the Basics controls,
set the Font to Arial.
- Set Size to 35 points.
- On the Attributes panel,
set the Face color to white.
- Draw a text box
on the viewport over the banner and type:
My
Composite.
- Click the Arrow
tool
 .
.
A text object
is created and added to the composite.

- Position the text
object so it is over the filled rectangle object.
Step 3: Creating the Drop Shadow
To create a sense of
depth, we add a drop shadow to the text caption.
To add a drop shadow:
- With the text
object selected, click the Shadow button to access the Shadow
controls.

- Click Enable
Shadow to activate the drop shadow controls, then create a drop
shadow using the following values:
- Click the Color
box and pick a bright yellow shade from the Pick Color dialog.
At this point,
the composite should resemble the following:

Step 4: Extending Object Duration
By default, a new object
exists only on the frame upon which you create it (therefore, it has a
one-frame duration). You have to extend the length of your Paint objects
so they last the entire duration of the animation.
To change object duration:
- Click the
Timeline tab to view the Paint objects. You have to extend their
duration to the end of the composite.

- Select the
objects. In this example, we select the My Composite object and the
Filled Rectangle object.
- Press the End
key to move to the last frame of the sequence.
- Press the period
(.)
key on the keyboard to extend the object length for the duration of
the sequence.

Note:
You can also set object duration using the Default Object Duration
setting in the Paint controls. For more information on object duration
and other Paint controls, see Introduction
to Paint.
Step 5: Playing the Animation
Now that all the elements
are in place, we are ready to play the animation.
To play an animation:
- Click the
Workspace tab.
- To display the
composite in the active viewport, double-click the composite in the
Workspace panel or click the Back button.

You exit Paint
and return to the composite.
- Click the Play
button
 to play through the animation.
Working with Audio
With the scratch-track
audio capabilities of combustion,
you can import audio, link audio to clips, slip audio to sync to your
composite, and save audio in workspaces for reference and organization.
For more information, see
Audio.
Note:
Supported file formats are WAV, AIFF, QuickTime embedded audio, and AVI
embedded audio.
To import and play back audio:
- Click the Audio
tab.
- In the Audio
panel, click the Browse button.
The Open Audio
dialog appears.
- Navigate to the
audio clip, select it, then click OK.
The clip is
imported. An audio waveform appears on the Audio panel.

- Enable Play
Region to restrict playback to a portion of the audio file.
- Click the Play
button to play the audio. Click the Stop button to stop audio
playback.
- Click the
Timeline tab.
- Enable Waveform
in the Timeline control buttons.

- Audio waveforms
appear in the Timeline.
- Hold down Ctrl+Alt
(Windows) or Command+Option
(Macintosh), then drag the waveform to change the position of
the audio with respect to the layers in your composite.